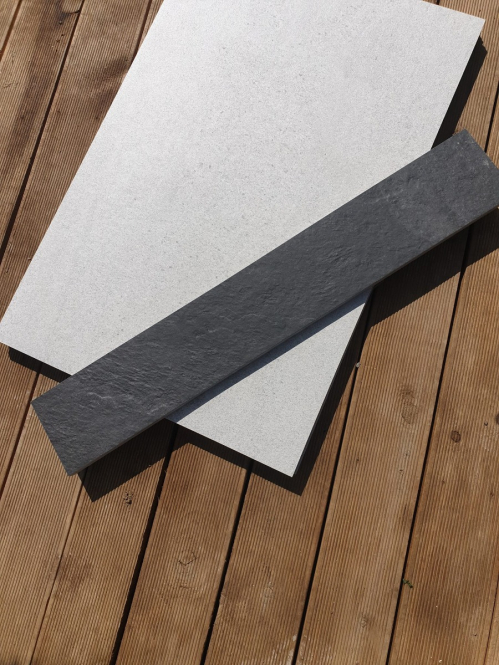
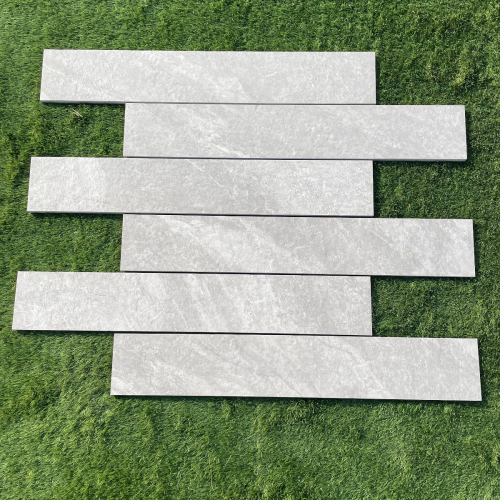
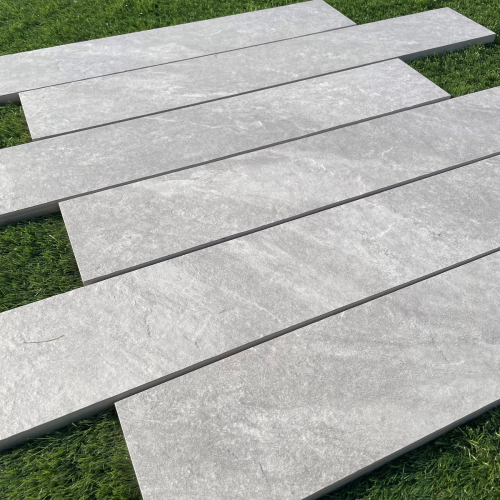
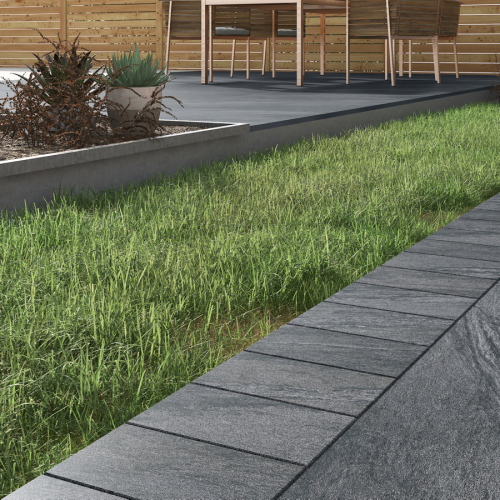
Edging, Planks and Steps
At Melton Stone we have some great accessories and finishing detail products for your home and garden project.
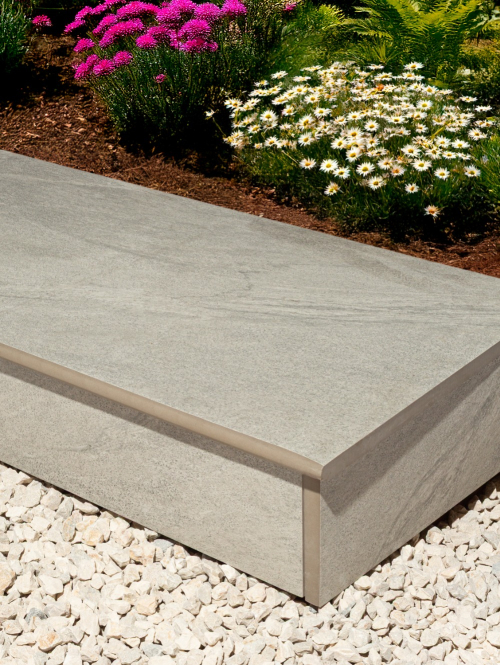
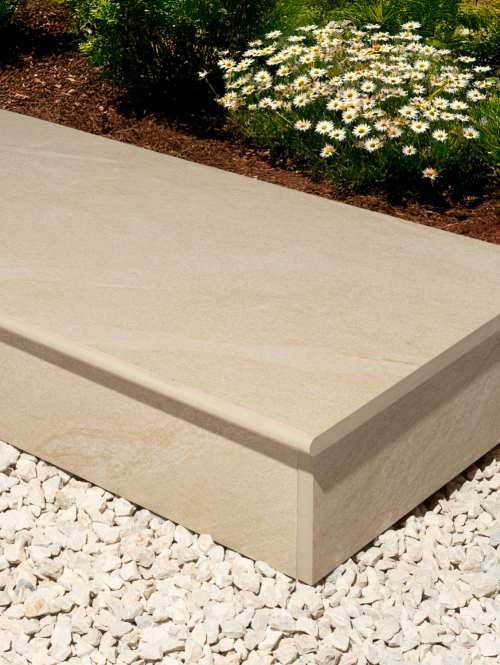
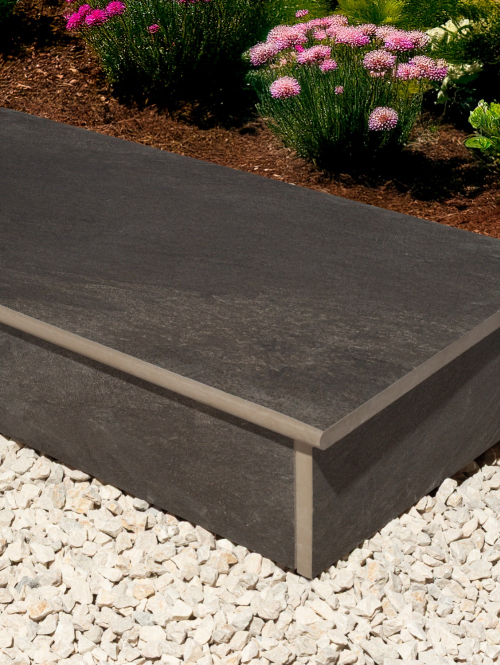
If you need edging plank or porcelain bull nose steps then we have an options available in grey, beige and anthracite porcelain.
If you would to find out more about our huge porcelain paving selection please contact one of our paving experts today.
Speak to a member of our friendly sales team today on 01482 688008 or Email sales@meltonstone.co.uk
-

 (5)Out of StockFREE Nationwide Delivery*
 -
 (5)£12.99inc VAT EachIn Stock - Immediate dispatch FREE Nationwide Delivery*
 -
 (4)£2.50inc VAT EachIn Stock - Immediate dispatch FREE Nationwide Delivery*
 -

 (4)£2.50inc VAT EachIn Stock - Immediate dispatch FREE Nationwide Delivery*
 -
 (11)£47.99inc VAT EachIn Stock - Immediate dispatch FREE Nationwide Delivery*
 -
 (10)Out of StockFREE Nationwide Delivery*
 -
 (10)£47.99inc VAT EachIn Stock - Immediate dispatch FREE Nationwide Delivery*
Edging, Planks and Steps
Cladding ideas for outdoor patio wall?
Cladding your outdoor patio wall can transform the space, adding style, texture, and personality to your outdoor area. There are numerous cladding options to choose from, each offering a unique look and feel. Here are some cladding ideas for your outdoor patio wall:
1. Natural Stone Cladding: Use natural stone such as limestone, slate, or stacked stone for a rustic and earthy appearance. Natural stone cladding adds a touch of elegance and blends beautifully with outdoor surroundings.
2. Brick Cladding: Classic brick cladding provides a timeless and traditional look. You can opt for reclaimed bricks for a vintage appeal or use modern bricks for a cleaner and contemporary appearance.
3. Wooden Cladding: Wooden cladding brings warmth and a natural touch to the patio. Choose weather-resistant wood like cedar or teak or consider using composite wood for a low-maintenance option.
4. Corten Steel Cladding: Corten steel cladding offers an industrial and modern look. Over time, it develops a unique weathered appearance, making it an eye-catching focal point.
5. Decorative Tiles: Use decorative tiles or mosaic patterns for a vibrant and artistic patio wall. These tiles can add a splash of colour and creativity to your outdoor space.
6. Concrete Panels: Large concrete panels provide a sleek and contemporary look. They can be left in their natural form or textured to mimic other materials.
7. Vertical Gardens: Create a living wall or vertical garden as a unique and eco-friendly cladding option. Filled with lush plants, it can add a fresh and inviting atmosphere.
8. Metal Panels: Metal cladding, such as aluminium or steel panels, can add an industrial touch to your patio. It's durable and available in various finishes.
9. Composite Cladding: Composite cladding combines wood fibres and recycled plastic, offering a sustainable and stylish cladding option.
10. Stucco or Rendered Finish: Apply a stucco or rendered finish for a clean and smooth appearance. It can be painted in various colours to match your patio's design.
11. Faux Stone or Brick Panels: Faux stone or brick panels offer the look of natural materials without the weight and cost. They come in various designs and are easy to install.
When choosing a cladding material, consider factors such as durability, maintenance requirements, climate resistance, and how it complements your patio's overall design. Additionally, ensure that the cladding material is suitable for outdoor use and can withstand exposure to weather conditions.
Take time to explore different cladding options and consider getting samples or consulting with a professional to determine which cladding idea best suits your outdoor patio wall and personal style preferences.
How do I install brick slips on my wall?
Installing brick slips on a wall is a great way to achieve the look of a traditional brick wall without the need for full-sized bricks. Brick slips are thin, lightweight pieces of brick that can be easily adhered to a wall surface. Here's a step-by-step guide on how to install brick slips on your wall:
Tools and materials you'll need:
1. Brick slips
2. Adhesive suitable for brick slips (e.g., tile adhesive or brick slip adhesive)
3. Notched trowel
4. Spacers
5. Level
6. Measuring tape
7. Spirit level
8. Tile cutter or angle grinder with a diamond blade
9. Mortar jointing tool (optional)
10. Sponge and bucket for cleaning
Installation steps:
1. Prepare the wall: Ensure that the wall surface is clean, dry, and free from any dust, dirt, or loose paint. If necessary, repair any cracks or imperfections in the wall and allow the repairs to dry completely.
2. Plan the layout: Plan the layout of the brick slips on the wall. Decide on the pattern you want and measure the area to determine the number of brick slips needed. Consider using a spirit level and chalk line to create straight reference lines for accurate installation.
3. Mix the adhesive: Follow the manufacturer's instructions to mix the adhesive. Use a suitable adhesive that is designed specifically for brick slips.
4. Apply the adhesive: Using a notched trowel, apply a layer of adhesive onto the back of a brick slip. Ensure the adhesive is evenly spread with the notches of the trowel.
5. Attach the brick slip: Press the brick slip onto the wall, starting from one corner or reference line. Wiggle it slightly to help the adhesive bond properly. Use tile spacers to create even gaps between the brick slips, ensuring consistent mortar joints.
6. Check for level and alignment: Use a level and spacers to check that each brick slip is level and aligned with the reference lines. Adjust as necessary.
7. Cut the brick slips: If needed, use a tile cutter or angle grinder with a diamond blade to cut the brick slips to fit at the edges or corners of the wall.
8. Continue the installation: Repeat the process, applying adhesive to each brick slip and attaching them to the wall. Use spacers to maintain consistent gaps between the slips.
9. Clean the excess adhesive: Wipe off any excess adhesive that may squeeze out from the gaps between the brick slips. A mortar jointing tool can be used to create a neater and more uniform mortar joint between the slips if desired.
10. Allow the adhesive to set: Let the brick slips set in the adhesive for the time specified by the adhesive manufacturer (usually 24 hours or more).
11. Grout the gaps (optional): If desired, use a suitable brick slip mortar or grout to fill the gaps between the brick slips. This can enhance the appearance and further mimic the look of a traditional brick wall.
Always follow the manufacturer's instructions for the adhesive and any other materials used in the installation process. If you are not confident in your DIY skills, consider seeking the help of a professional installer to ensure a successful brick slip installation.
What plank edging options for porcelain patio?
For a porcelain patio, you have several plank edging options to choose from, each offering its own unique style and functionality. They can enhance the appearance of your patio while providing a clean and defined border. Here are some plank edging options for a porcelain patio:
1. Porcelain Plank Edging: You can opt for porcelain tiles or pavers specifically designed for edging purposes. These tiles are similar in design and colour to the main patio tiles, creating a seamless transition between the patio surface and the edging.
2. Wooden Sleepers: Wooden sleepers are a classic choice for edging, providing a natural and rustic look to the patio. Choose weather-resistant wood, such as pressure-treated pine or hardwood, to ensure durability and longevity.
3. Composite Planks: Composite planks are made from a blend of wood fibres and recycled plastic, offering the appearance of wood without the maintenance requirements. They are weather-resistant and come in various colours and finishes.
4. Brick or Stone Edging: Use bricks or natural stone pavers as plank edging to complement the porcelain patio. These materials can create a harmonious and coordinated look, especially when the colours or textures complement each other.
5. Concrete Plank Edging: Precast concrete planks or pavers can provide a sleek and contemporary appearance to the patio's borders. They come in various sizes, shapes, and colours, offering versatility in design.
6. Metal Plank Edging: Metal edging, such as steel or aluminium, can lend a modern and industrial touch to the patio. It provides a durable and long-lasting option that contrasts well with porcelain tiles.
7. Curved Edging: Consider using flexible edging materials, like plastic or rubber, to create curved or flowing lines around the patio. This option allows for more creativity in shaping the patio's borders.
8. Mosaic or Decorative Edging: Use decorative tiles or mosaic patterns as edging to add artistic flair and visual interest to the patio's borders.
When choosing the plank edging for your porcelain patio, consider the overall design theme, the colour scheme, and the level of maintenance you are willing to undertake. Ensure that the edging material complements the porcelain tiles while also fulfilling your functional and aesthetic requirements.
Before making a final decision, consider obtaining samples or visiting a local garden centre to see different plank edging options in person. This will give you a better sense of how each material and style will look in your specific patio setting.
How to bull nose a porcelain paving step?
Bull nosing a porcelain paving step involves creating a rounded edge or profile on the exposed front edge of the step, providing a smooth and finished look. Here's a general guide on how to bullnose a porcelain paving step:
Tools you'll need:
1. Wet tile saw with a diamond blade or a specialized bullnose profiling machine
2. Safety glasses and ear protection
3. Sandpaper or diamond hand pads (optional)
4. Safety gloves
Steps:
1. Measure and mark: Determine the desired width and depth of the bullnose profile on the front edge of the step. Measure and mark these dimensions on the step, ensuring the markings are even and symmetrical.
2. Prepare the saw: If using a wet tile saw, set it up according to the manufacturer's instructions. Ensure the diamond blade is securely mounted and adjusted to the desired cutting depth.
3. Make the initial cut: Carefully position the step on the saw's cutting surface, aligning the marked line with the blade. Slowly feed the step into the blade, making a shallow initial cut along the marked line. This initial cut will serve as a guide for the subsequent bullnose profiling.
4. Bullnose profiling: Depending on the tools available, there are a few options for creating the bullnose profile:
- If using a specialized bullnose profiling machine: Follow the manufacturer's instructions for setting up and operating the machine. The machine will have different settings for creating the desired bullnose profile. Feed the step through the machine, gradually shaping the edge to achieve the desired rounded profile.
- If using a wet tile saw with a diamond blade: Adjust the cutting depth of the blade to match the desired bullnose profile. Slowly and carefully feed the step through the blade, making multiple passes to gradually shape the edge into a rounded profile. Take your time and be cautious to avoid chipping or damaging the step.
- If a specialized tool is not available: You can try using sandpaper or diamond hand pads to manually shape and smooth the front edge of the step into a rounded profile. This method requires patience and precision, as you'll need to hand sand and shape the edge gradually.
5. Refining the bullnose edge (optional): After creating the initial bullnose profile, you can further refine and smooth the edge using sandpaper or diamond hand pads. Gently sand the profiled edge in a circular or back-and-forth motion, gradually working your way to finer grits of sandpaper or pads for a polished finish.
6. Clean and inspect: Once the bullnose profile is achieved, clean the step to remove any dust or debris. Inspect the profiled edge for any rough spots or imperfections and make any necessary refinements with sandpaper or hand pads.
Always prioritize safety when working with power tools or sharp blades. Wear appropriate safety gear, such as safety glasses and gloves, and follow the manufacturer's instructions for operating any tools or machinery. If you are not comfortable or experienced in using power tools, it may be best to consult with a professional for the bull nosing process.
What size plank edging to use around my patio?
The size of plank edging to use around your patio will depend on the overall dimensions of the patio, the style you want to achieve, and personal preferences. It is commonly used to create a border or frame around the patio, providing a clean and defined edge while also serving as a functional barrier.
