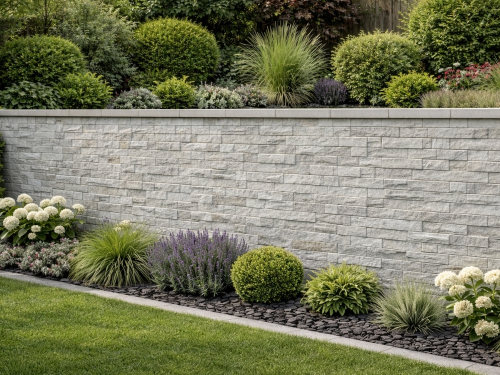
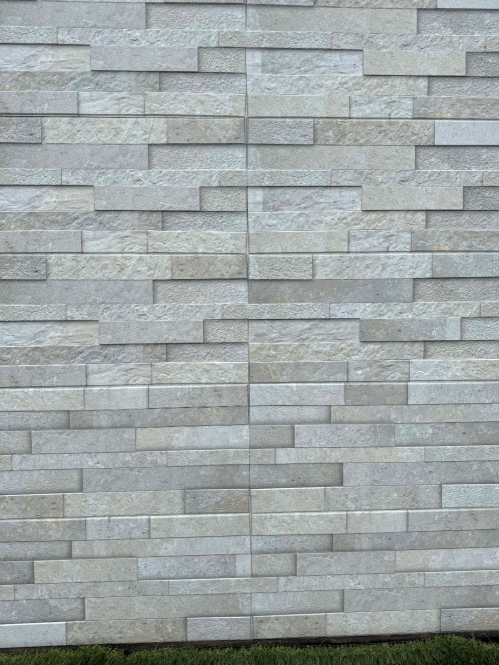
Outdoor Wall Cladding
Wall Cladding has become increasingly popular over the last few years with homeowners alike using them to clad breeze brick walls.
Whether you are using it for more of a practical feature or using them to create a statement within your new patio area.
If you would to find out more about our huge porcelain paving selection please contact one of our paving experts today.
Speak to a member of our friendly sales team today on 01482 688008 or Email sales@meltonstone.co.uk
-
 (3)From£49.99£17.50inc VAT Per M2In Stock - Immediate dispatch FREE Nationwide Delivery*
Outdoor Wall Cladding
How to install wall cladding tiles outdoor?
Installing wall cladding tiles outdoors follows a similar process to indoor installations, but there are some additional considerations due to exposure to weather and other external factors. Here's a general guide on how to install wall cladding tiles outdoors:
Materials you'll need:
1. Wall cladding tiles suitable for outdoor use (such as natural stone, porcelain, or weather-resistant ceramic tiles)
2. Tile adhesive suitable for outdoor applications
3. Notched trowel
4. Tile spacers
5. Level
6. Rubber mallet
7. Tile cutter or wet saw
8. Grout
9. Grout float
10. Sponge and bucket for cleaning
11. Sealer (optional, depending on the type of tiles)
Installation steps:
1. Prepare the surface: Ensure that the surface where the wall cladding will be installed is clean, dry, and free from any dirt, dust, or debris. If the surface is uneven or has imperfections, consider using a suitable render or patching material to create a smooth and level surface.
2. Apply tile adhesive: Using a notched trowel, spread a layer of tile adhesive onto the prepared surface. The size of the notches on the trowel will depend on the size of the tiles being used. Work in small sections to prevent the adhesive from drying out before you can install the tiles.
3. Install the tiles: Press each tile firmly into the adhesive, using a slight twisting motion to ensure a good bond. Use tile spacers to maintain consistent gaps between the tiles for grouting. Check the level regularly to ensure the tiles are straight and even.
4. Cut tiles as needed: Use a tile cutter or wet saw to cut tiles to fit around edges, corners, or other obstacles on the wall.
5. Allow the adhesive to set: Let the tiles set in the adhesive for the time recommended by the manufacturer (usually 24 hours or more).
6. Grouting: Once the adhesive has set, remove the tile spacers, and apply grout between the tiles using a grout float. Press the grout firmly into the gaps, ensuring they are completely filled.
7. Clean the tiles: After grouting, wait for the grout to set slightly, and then use a damp sponge to clean the excess grout from the tile surfaces. Rinse the sponge frequently to avoid smearing grout over the tiles.
8. Finishing touches: Once the grout has fully cured, consider applying a sealer (if recommended for your specific tiles) to protect the tiles from moisture and stains.
Always follow the manufacturer's instructions for the tile adhesive, grout, and sealer, as different products may have specific requirements. Additionally, consider local weather conditions and make sure the tiles you choose are suitable for outdoor use, as some materials may be more prone to damage from freezing temperatures or direct sunlight. If you are uncertain about the installation process, it's a good idea to seek the assistance of a professional tiler.
Wall cladding ideas for patio?
Wall cladding can add a beautiful and functional element to your patio, enhancing its overall aesthetics and creating a cozy and inviting outdoor space. Here are some wall cladding ideas for patios:
1. Natural Stone Cladding: Use natural stone cladding, such as limestone, slate, or stacked stone, to create a rustic and earthy ambiance on your patio. Natural stone adds texture and character, giving your patio a timeless and elegant look.
2. Porcelain Tile Cladding: Porcelain tiles come in a wide range of colours and patterns, allowing you to create various design styles on your patio. Porcelain cladding can be sleek and modern or mimic the look of natural stone for a more organic appearance.
3. Brick Cladding: Exposed brick walls add a touch of charm and warmth to your patio. You can use reclaimed bricks for a vintage look or opt for new bricks for a cleaner and more contemporary style.
4. Wooden Cladding: Wooden cladding can create a warm and inviting atmosphere on your patio. Choose weather-resistant wood species like cedar or teak and consider vertical or horizontal plank arrangements to suit your design preferences.
5.Vertical Gardens: Install a living wall or vertical garden as your patio cladding. Planters filled with lush greenery and flowers can create a vibrant and fresh outdoor space.
6. Decorative Tiles: Use decorative tiles or mosaic patterns to add visual interest and personality to your patio walls. These tiles can become a focal point and create a unique and artistic atmosphere.
7. Textured Cladding: opt for textured cladding options like 3D tiles or textured panels to add depth and dimension to your patio walls.
8. Metal Cladding: Metal cladding, such as Corten steel or metal panels, can lend a modern and industrial vibe to your patio, creating a striking contrast against greenery and natural elements.
9. Pebble or Stone Mosaic: Create a captivating accent wall using pebble or stone mosaic cladding. This unique approach can bring a touch of nature and creativity to your patio.
When choosing the right wall cladding for your patio, consider the existing design elements, the overall theme of your outdoor space, and the level of maintenance you are comfortable with. Additionally, think about how the wall cladding will complement the other features of your patio, such as flooring, furniture, and landscaping.
Do I need to grout wall cladding?
Yes, you typically need to grout wall cladding, including wall cladding made of porcelain tiles. Grouting is an essential step in the installation process, as it helps secure the tiles in place, fills the gaps between them, and provides a finished and polished appearance to the wall cladding.
How to cut wall cladding porcelain?
Cutting wall cladding porcelain tiles can be done using various tools and techniques. Here are the steps to cut wall cladding porcelain tiles:
Tools you'll need:
1. Wet tile saw or angle grinder with a diamond blade
2. Measuring tape
3. Pencil or marker
4. Safety glasses and ear protection
Steps:
1. Measure and Mark: Measure the area where the porcelain tile needs to be cut and mark the cutting line on the tile using a pencil or marker. Ensure that your measurements are accurate to avoid unnecessary waste.
2. Setup the Tile Saw or Angle Grinder: If you are using a wet tile saw, fill its reservoir with water to keep the blade cool and to minimize dust. If using an angle grinder, make sure you have a suitable diamond blade attached. Put on your safety glasses and ear protection.
3. Position the Tile: Place the porcelain tile on the cutting surface of the tile saw or the workbench if using an angle grinder. Align the marked cutting line with the blade.
4. Make the Cut: For a wet tile saw, gently push the tile through the blade along the marked cutting line. Let the saw do the work and avoid applying excessive pressure to prevent chipping or cracking. For an angle grinder, carefully guide the grinder along the marked line, making steady and controlled cuts.
5. Safety Note: Cutting porcelain tiles can generate dust and debris, so ensure you are working in a well-ventilated area and wear a dust mask to protect your lungs.
6. Smooth the Edges: After making the cut, you may notice some rough edges. Use a tile file or sandpaper to smooth and chamfer the cut edges if needed.
7. Clean the Tile: Once the cut is complete, clean the tile to remove any dust or debris before installing it.
Always take proper safety precautions when cutting tiles, especially when using power tools. If you are unfamiliar with tile cutting or unsure about the process, consider seeking assistance from a professional or practicing on scrap pieces of porcelain tiles before cutting the ones for your wall cladding project.
